Proverb

A woman who fears the Lord, she shall be praised.
Give her the product of her hands,
And let her works praise her in the gates." (Proverbs 31:30b-31, NASV)
Showing posts with label Kimberly's Kitchen. Show all posts

Sunday, April 6, 2014

Orange Cardamom Muffins


So...a lot's happened since my last post. The big things have been our moving into a new house, which we absolutely love, and the entirely unexpected promotion I received at work (our Lord is so good!). So with moving, cleaning, painting, and with training, transitioning, starting, I've had little time for my dearly loved blog. But no more! My schedule's been set (Monday through Friday's a nice gig) and our house has been settled (for the most part, any way), and so here I am, ready to post again.

And to bring in a new season of posts, I am sharing one of my favorite recipes for breakfast. Adapted from a Food.com recipe, I gave it a twist with the addition of freshly ground cardamom. Cardamom and oranges are one of those BIG WIN combinations, giving a floral note to the sweet bite of citrus. I added it because, for me, the original recipe was a bit too bitter due to the orange rind. The cardamom cuts the bitterness without overpowering the muffin. I also included a bit of ground flax seed for a touch of nutty flavor.

These make for an excellent breakfast meal - a quick, easy choice to help me get out the door and onto my day. I enjoy a muffin in the mornings, after fixing my hair and strapping on my high heels, with a cup of coffee in my favorite chair.


Orange Cardamom Muffins  
Recipe by: Kimberly Meyers
Adapted from: http://www.food.com/recipe/fresh-orange-muffins-14325

www.jandkalways.blogspot.com
As always, this recipe is tried and true from my kitchen to yours.

Serving size: 12 Prep Time: 15-20 minutes Cook Time: 20 minutes Rest: 5-10 minutes

Ingredients:
1 orange with peel, quartered and seeds removed
1/2 cup orange juice (or if using fresh oranges, 1 orange squeezed and add water to make 1/2 cup)
1 large egg
1/2 cup butter
1 3/4 cups all-purpose flour
3/4 cup white sugar
1 tsp. baking powder
1 tsp. baking soda
1 1/2 tsp. ground cardamom (or if using mortar and pestle, grind seeds from approx 24 cardamom pods)
1 tsp. ground flax seed
1/4 tsp. salt

Directions:
Preheat oven to 400 degrees Fahrenheit. Use muffin liners or take a paper towel and vegetable shortening to grease muffin tin. Combine dry ingredients together in a bowl and set aside. Place orange quarters and orange juice in food processor and puree. Add egg and butter to oranges and blend well. Pour wet mixture into a bowl, then add dry ingredients. Fold together. Fill muffin cups about 3/4 full. Bake for 20 minutes. Prick with a toothpick to make sure they are done, then let cool for approximately 5 minutes before removing from tin. Kept at room temperature on a plate covered with saran wrap, these will hold up for several days. Enjoy!


Always,
Kimberly

Wednesday, December 18, 2013

Korean-Style Braised Mackerel (Godeungeo Jorim)


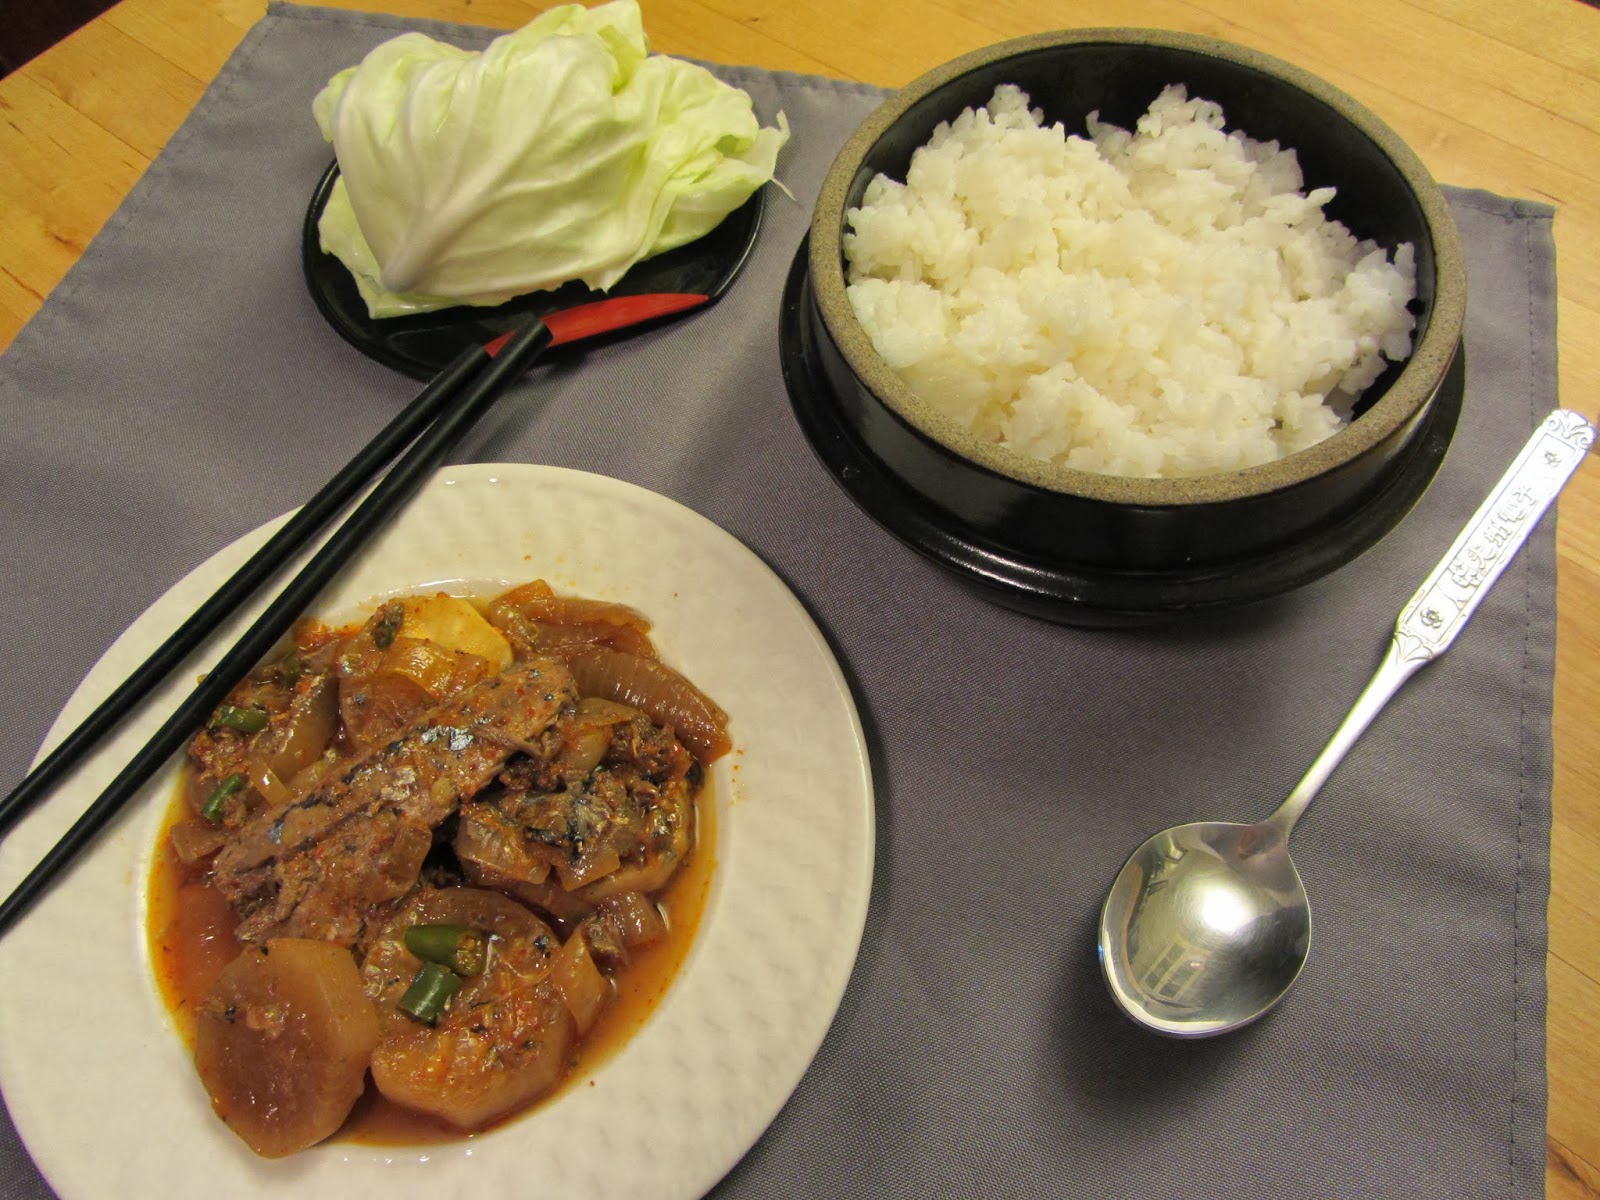
To me, there is nothing on Earth more delicious to eat than Korean cuisine. It's what I think of when I think "comfort food." Full of hot spices, sour flavors, and a savoriness that cannot be outdone, it's really a Seoul-ful style of food. Being half Korean, I spent a lot of time in my youth eating the delicious dishes my "halmoni," grandmother, would prepare: kimchi (spicy fermented cabbage), mandu (dumplings), gimbap (Korean sushi), naengmyeon (cold noodle soup), yukaejang (spicy beef and vegetable soup), pajeon (green onion pancakes)... If I were to pick my last meal, it would be, hands down, Korean food the way my halmoni made it. And today I would like to share with you one of my favorites: godeungeo jorim AKA braised mackerel. 

Mackerel is a fishy fish - very oily, but that makes it a great source of omega-3 fatty acids. This braised mackerel is a very healthful dish, and the spiciness will clear out your sinuses stat. On a 1-5 scale of spiciness, I would put this at a 4.5. It's belly-warming, mouth-burning good. Serve it with steamed rice and either steamed cabbage leaves (as I've done here) or fresh red leaf lettuce to cut some of the heat. You don't have to remove the fish bones, as they come fully cooked in the can and add a satisfying, crunchy texture (but feel free to remove them if you'd like).

Now if you're new to Korean food, don't be intimidated by what I just said about the fish bones or by the ingredients on this list - fish bones are full of nutritious calcium, and the ingredients should be easy to find at your local Asian market. And you can easily lessen the spice level by cutting back on the peppers and red chili flakes.

Here we go!

Chop chop!


Strain!


Combine!

Make sauce!


Pour!


Drench!


Boil!

Steam!

Serve! 

Wrap!

Nom nom nom nom!


As always, this recipe is tried and true from my kitchen to yours,
Kimberly
---------------------------------------------------------------------------------------------------------------------------------

Korean-Style Braised Mackerel (Godeungeo Jorim)  
Recipe by: Kimberly Meyers
www.jandkalways.blogspot.com

Serving size: 4 Prep Time: 5-10 minutes Cook Time: 15 minutes
As always, this recipe is tried and true from my kitchen to yours.

Ingredients:
1 14oz. can boiled Mackerel, strained with juices reserved
1/2 lb. Korean radish (or daikon), sliced in 1/2" slices
1/2 onion, sliced
1 large garlic clove, finely chopped
1 tsp. finely chopped ginger
3 Tbl soy sauce
1 Tbl. Mirin (rice wine)
1 Tbl. Korean chili flakes
1-3 Birds Eye Thai chilis, sliced (optional - omit to lessen the heat if desired)
Cabbage leaves for wrapping, steamed, or uncooked red leaf lettuce
Boiled white rice for serving

Directions:
Boil white rice according to package directions. In a separate heavy bottom, non-stick pot, turn heat to medium and add radish and onion slices (no need to add oil). Add strained Mackerel pieces on top. In a small bowl, combine reserved Mackerel juices with garlic, ginger, soy sauce, Mirin, Korean chili flakes, and Thai chilis. Pour sauce over fish, turn heat to high and bring contents to a boil, then set heat to low, cover, and simmer for 10-15 minutes until the radish becomes tender (the fish and radish will render additional juices during cooking). Halfway through cooking, use a spoon to carefully baste fish and veggies with juices, being careful not to break up fish. Meanwhile, in another pot, place cabbage leaves in a strainer and steam over boiling water for 5 minutes until tender. Serve with chopsticks and enjoy!

Monday, October 21, 2013

Cook for a Day, Eat for a Week!


My weekly cooking adventure led me on a two day journey. The first day I was in bakery-land, immersed in a world of white flour puffs and sugary grains, chopped apples, and savory nuts. The second day was stove-top land, where pot is King (the kind you boil water in, of course!). At the end of my journey, I returned to my husband with great riches:

Main Dishes:
Chili con Carne
Fettucine with Sausage and Peppers
White Navy Bean Soup

Sides:
Cornbread Muffins
Milk Bread Rolls
Honey and Peanut Oatmeal Bars

Dessert:
Brown Sugar Apple Cake

Until the next adventure...

Always,
Kimberly

Tuesday, October 15, 2013

Lasagna Pinwheels


There is a simple truth in life: Lasagna is comfort food, and comfort food is lasagna. Oooey, gooey cheesy mceasy lasagna. It's pastalicious. It's tomato...icious. And best of all, it can be very easy to make (and even easier to eat)!


This recipe is so flexible - you can make it as easy or complex as you'd like. You can go to great (and commendable lengths) and make your own pasta sauce, ricotta cheese, and lasagna noodles from scratch, or you can go the easier route with grab and go items from the grocery store. With this recipe I split the difference, choosing to shred myself a block of parmesan cheese and cut up fresh mozzarella slices. I also go with an organic, bottled tomato basil sauce. My feeling toward food is the less preservatives the better, and just by taking a few of these extra steps to buy "whole" foods I find that our meals are a lot healthier and the process virtually similar (I find there's always time while waiting for the water to boil or the oven to heat to get some cheese grating done). Just be sure to season the cheese mixture well with salt and pepper before rolling, and don't hesitate to add fresh basil or minced onion or whatever else you may have available. Also, you could easily add browned ground beef to the pasta sauce. Oh the options - the endless pasta-bilities!!

As with most lasagna dishes, this one is better the next day (but don't let that stop you if you're hungry!) Heat up one pinwheel for a easy, quick lunch, or pair two or three with buttered, toasted cheese bread and a bright green salad for a wonderfully filling dinner.

As always, this recipe is tried and true from my kitchen to yours,
Kimberly
---------------------------------------------------------------------------------------------------------------------------------

Lasagna Pinwheels                           Serving size: approximately 12 "Pinwheels"
Recipe by: Kimberly Meyers
As always, this recipe is tried and true from my kitchen to yours.

Ingredients:
8 oz. box lasagna noodles, cooked and drained
1 15 oz. jar spaghetti tomato sauce (your favorite brand)
1 10 oz. package frozen spinach, dethawed, minced
1 15 oz. carton Ricotta cheese
8 oz. Parmesan cheese, grated
4 oz. Mozzarella cheese, sliced or grated
1 egg, beaten
1 tsp. dried oregano leaves
1 tsp red chili flakes
Salt and black pepper to taste

Directions:
Preheat the oven to 350 degrees Fahrenheit. To a pot of salted, boiling water, add lasagna noodles and cook until "al dente" 8-10 minutes; drain and let cool. Into a 13x9 inch baking dish, pour 1/4 jar of sauce and evenly coat the bottom. Combine in a bowl the minced spinach, ricotta cheese, parmesan cheese, beaten egg, dried oregano, red chili flakes, plenty of salt and black pepper to taste. Mix well. Spoon about 1 Tablespoon or more of the mixture onto each noodle and roll into a pinwheel. Place pinwheels, seam side down, into sauce. If there is any mixture leftover, combine with remaining spaghetti sauce and pour on top of noodles. Top with mozarella cheese. Cover with aluminum foil and bake for 50 minutes. Once done, broil the top for 5 to 10 minutes until the cheese is golden brown.

Yummy now, but best served the next day or two.

Saturday, September 28, 2013

Cook for Half a Day, Eat for Half A Week Part 2


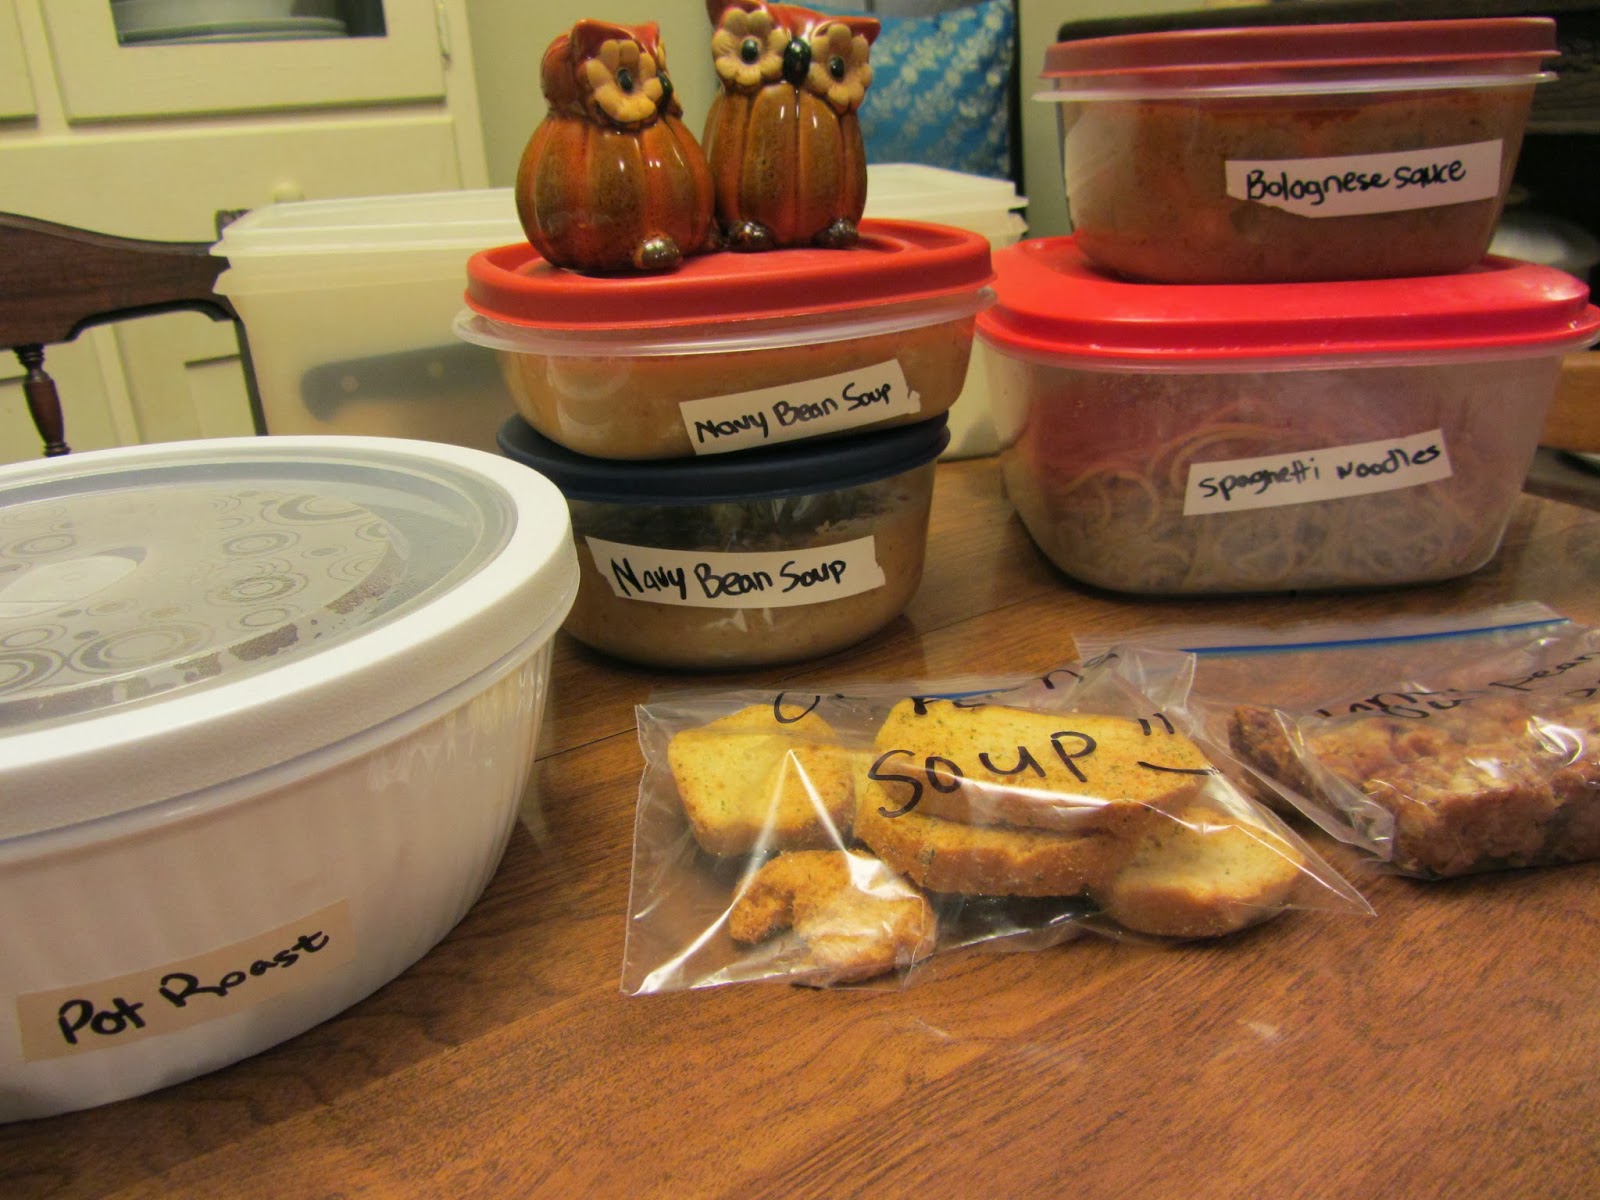
I am happy to say that Part 2 of my Cook for Half a Day, Eat for Half a Week week was another great success! This time, my cooking schedule started in the evening, after getting home from work. With all of the proteins defrosted and ready to go in the fridge, and a bowl of dry navy beans soaking in water since the morning, I whipped together:

Main Dishes:

  • Pot Roast with Vegetables
  • Navy Bean Soup
  • Spaghetti with Bolognese Sauce

That picture is just a sampling of how much food this turned out to be! This is just our portion - we also took 2 servings of each item over to my husband's great-grandmother's house (she's 97 years young!), so she'd be set for the week as well - it's good to share the food love. :)

Always,
Kimberly

Tuesday, September 24, 2013

Today in Kimberly's Kitchen - Cook for Half a Day, Eat for Half a Week!

Ever since I was introduced to Cook for a Day, Eat for a Week cooking, I've been hooked to the idea (I'm pretty sure I can thank Rachel Ray for that one). In exchange for a few hours on my feet in the kitchen, I can call it a week with a refrigerator full of ready-to-go homemade meals? Yes please! Today was one of those days - well, kind of. With work at 4pm, I started at ten this morning and got half a day of cooking in (with another half to go later this week). But all-in-all, I was pretty pleased with what I got accomplished.


Main Dishes:
  • Beef Curry with Apples and Peanuts
  • Macaroni and Cheese Casserole with Bacon and Green Peppers

Sides:
  • 2 Loaves of Homemade White Bread
  • White Rice
  • Oven Baked Tortilla Chips

Snacks:
  • Honey Oatmeal Bars with Peanuts (a variation of this recipe)


And guess what I'm having for dinner??? Leftovers from Sunday's trip to the diner!! LOLOLOL. ;)

Always,
Kimberly

Friday, September 13, 2013

Today in Kimberly's Kitchen - Peach and Plum Buckle

Today in Kimberly's Kitchen: Peach and Plum Buckle! My husband visited our local produce stand yesterday and brought home two baskets full of fresh plums and Georgia peaches. Tiny bits of fresh cut fruit add punches of tart sweetness in this light and airy cake, all topped with a nutty, cinnamon Streusel. A wonderful breakfast when paired with a cup of hot coffee, or a great light dessert after dinner. Recipe coming soon :)


Always,
Kimberly

Monday, August 19, 2013

Oatmeal Energy Bars with Fruits and Nuts


Snacks are an essential item in any household, yet I find that it can be difficult to get healthy snacks at the grocery store, as most of them are packed with preservatives to stay fresh on the shelf, and even the seemingly healthy ones often have a good ol' mix of "natural and artificial flavors." Determined to come up with something a bit better than that, I found this wonderful recipe for energy bars in The Joy of Cooking, and I would love to share it with you. 

Oatmeal Energy Bars with Fruits and Nuts

To start, preheat the oven to 350 degrees Fahrenheit. Line a 9x9-inch square baking pan with aluminum foil and grease well (Pam spray makes this quick and easy).

Combine in a medium bowl:
  • 1 cup old-fashioned oats


  • 3/4 cup all-purpose flour


  • 1 cup packed dark brown sugar


  • 1 1/2 cups packed dried fruit, chopped (this is a beautiful combination of plums, apple slices, apricots, and dates)


  •  1/2 cup nuts, chopped (I'm using walnuts and slivered almonds)


  • 1/4 teaspoon salt
  • 3/4 teaspoon ground cinnamon


  • 1 1/2 sticks unsalted butter, melted


  • 1 1/2 teaspoons vanilla extract


 Stir until well blended:


Press the mixture into the baking dish. Bake until top is golden brown, 35-40 minutes. 


Love how it bubbles from all the delicious butter!


Very important: Cool in the pan on a rack for about 1 hour. Without the proper cooling time, these can be very difficult to cut, as they are super oober gooey. Plus, cutting too early can sometimes cause aluminum foil stickage, which is not so snackable. Once thoroughly cooled, cut in half and then into bars, totaling 12 bars.


Here's a side view, where you can see all of the jam-packed goodness. These are one-zillion times better than the kind you buy individually wrapped at the store - and better yet they're all natural!


One of the best things about this recipe is that it can be easily kept frozen and thaws quickly so it's ready to eat fast! To freeze, simply line layers of energy bars with wax paper in a freezer-safe container.


As always, this recipe is tried and true from my kitchen to yours,
Kimberly
---------------------------------------------------------------------------------------------------------------------------------

Oatmeal Energy Bars with Fruits and Nuts                          Serving size: 12 bars
Recipe by: Kimberly Meyers
Adapted from: The Joy of Cooking
www.jandkalways.blogspot.com

As always, this recipe is tried and true from my kitchen to yours.

Ingredients:
1 cup old-fashioned oats
3/4 cup all-purpose flour
1 cup packed dark brown sugar
1 1/2 cups packed dried fruit, chopped (apricots, pitted dates, raisins, figs, cherries, cranberries, and/or plums)
1/2 cup nuts, chopped (walnuts, pecans, hazelnuts, and/or almonds)
1/4 teaspoon salt
3/4 teaspoon ground cinnamon
1 1/2 sticks unsalted butter, melted
1 1/2 teaspoons vanilla extract

Directions:
Preheat the oven to 350 degrees Fahrenheit. Line a 8x8-inch square baking dish with aluminum foil and grease well (Pam spray works well). Combine in a medium bowl oats, flour, brown sugar, fruit, nuts, salt, and cinnamon. Add butter and vanilla and stir until well blended. Press the mixture into the pan. Bake until top is golden brown, 35-40 minutes. Cool in the pan on a rack for at least 1 hour. Once thoroughly cooled, cut in half then into 12 bars. To freeze: line layers of energy bars with wax paper in a freezer-safe container.